
New Skis and Snowboards Need to be Tuned Before They are Used!
Yes, you read the title correctly; new skis and snowboards should be tuned. John Anderson from The Ski Zone staff has been a ski industry equipment rep to ski instructors for years and understands how to maximize a ski and snowboard's performance.
Most modern ski bases are made from a porous, graphite-sintered material called P-Tex. Shaving a thin piece of P-Tex from a large slab of P-Tex makes a ski base. As the piece is cut, hairs that held the larger block together are separated, but not completely removed. These hairs need to be removed to ensure less friction between the ski and the snow surface. Further, the base needs to be prepared to allow wax to penetrate the pores, which will increase how fast the skis glide.
In addition, when a ski sits, even for a short period of time, the base dries and oxidates. This causes the ski to slide poorly and if not fixed can cause damage to the base of the ski or snowboard.
Follow the directions below to ensure the optimal performance from your new skis and snowboard. Note, you should also follow these directions after a ski or snowboard has been stone ground.
Ski & snowboard tuning steps:
Follow the steps below to tune your skis or snowboard.
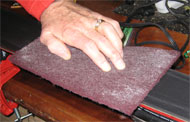
Step 1 - Remove micro-fibers and oxidation
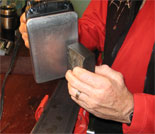
Clean with nylon abrasion pad. Work the base with a nylon abrasion pad to remove micro-fibers and oxidation. Use the pad in both directions at least 50 times.
Clean with coarse bronze brush. While working the base with the abrasive pad, use a bronze brush intermittently to lift and cut micro fibers. Work the brush from the tip to tail.
Step 2 - Bevel ski/snowboard base edges
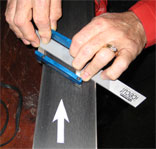
With a modern ski, the base edge of the ski should not be completely flat; they should be at a .5° to 1° angle from the base. This is called a bevel. If you do not bevel the ski, it will be very grabby, which makes it hard to start and end turns.
Note many manufacturers sell the ski already beveled. If the manufacturer bevels the ski, skip Step's 2 and 3.
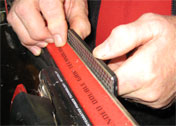
Follow the ski manufacturer's recommendation for the degree of the bevel. Work the file from the tip of the ski to the tail. On your first passes down the ski you should use a file (i.e., 16 teeth per cm) to cut the initial bevel. Once this is done, make the next passes down the ski with a fine-toothed file (i.e., a file with 20 teeth per cm) to obtain a smoother bevel. Most manufacturers recommend a .5° - 1° base bevel. To keep metal filings out of the base, brush with a clean paintbrush. This should be done frequently.
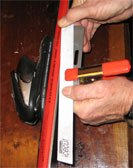
Step 3 - Bevel ski/snowboard side edge
Ski manufacturers are making today's skis with more side cut. This makes the ski turn quicker, but it is too quick for most skiers. By properly beveling the ski, it will turn easier, giving the skier a more user-friendly skiing experience.
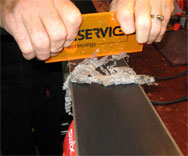
To protect the base of the ski while you are filing, apply a PVC Ski Tape to the base of the ski. Make sure that the tape abuts the base edge metal and runs the full length of the ski. Brush away filings with a paint brush to protect both the ski base and beveling tool. If the file is biting into the sidewall, a perfect bevel cannot be achieved. If this happens you will need to cut back the sidewall with a sidewall cutter. On your first passes down the ski you should use a panzer file to cut the initial bevel. Once this is done, make the next passes down the ski with a fine-toothed file (i.e., a file with 20 teeth per cm) to obtain a smoother bevel. Most manufacturers recommend a 1° - 3° side bevel. Race skis are beveled as high as 5°.
Step 4 - Deburr ski/snowboard edge
Freshly filed metal edges are not smooth. They are also unprotected and susceptible to excessive wear. To fix this, we use diamond files and ceramic polishing stones to finish the edge. This will provide a clean, smooth and hard edge.
This is a multi-step process where you use a progressively finer series of diamond files and ceramic polishing stones to smooth out the edges. You will perform these steps on the base and side edges. You will always work from the tip of the ski to the tail of the ski.
Start filing with a 100 grit diamond file, then a 220 grit and finally a 400 grit. This will leave the edges clean and smooth. Note spraying a polishing solution on the files accelerates the cutting/polishing action, while increasing the diamond file life. Finish the base and side edges with a ceramic polishing stone in incrementally finer grits. This will harden the metal so your tuned edges will last longer. Two sided polishing stones are available with medium grit on one side and fine grit on the other side. These are highly recommended. Again, use of a polishing solution is recommended for a smoother polish and less wear on expensive stones.
Step 5 - Clean the ski/snowboard base
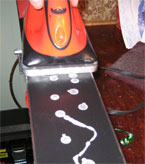
You clean a ski by hot waxing it and then removing the wax. This step achieves two objectives: First, it pulls metal filings and other impurities out of the base. Second, it opens the base pores so that a hard base wax can impregnate the P-Tex, thus providing protection from abrasion and increase the skis ability to slide.
Hot wax the ski with a soft wax (25°F - 50°F) or a prep wax. After the wax is applied and while it is still warm, scrape it off with a sharp plastic scraper. Repeat to ensure that the ski is clean.
Step 6 - Apply base wax
This process establishes a foundation wax upon which a universal or race wax (i.e., softer waxes) can be applied later. It also lifts more micro hairs from the base and stands them up so they can be cut off with the scraper.
Hot wax with a hard wax (14°F - 21°F), then scrape while the wax is still warm.
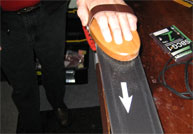
Step 7 - Use a coarse bronze brush
A coarse bronze brush cleans out the minute grooves in the structure of the base. Note manufacturers cut a series of lines or patterns into the base (called the structure) to enhance glide. Structure works by funneling water (melted by the ski when it passes over the snow) into grooves of the base, thus preventing suction between the ski and the snow. Brushing will also lift and cut micro hairs from the base.
Brush the ski base from the tip to the tail for 50 strokes.
Step 8 - Apply final wax
This step saturates the wax into the base and conditions the ski to accept the final overlay coat of wax.
First, hot wax with a soft wax (25°F - 50°F) and let cool for 5 min. Scrape using a plastic scraper and work with a bronze brush tip to tail. Repeat this step 4-6 times.
Second, apply the final wax, which should be one appropriate for the snow conditions you will be skiing.
Step 9 - Improve glide of ski/snowboard
To keep your skis performing at their optimal level, wax your skis every day they are used. To protect your skis after the ski season is over, hot wax with a cold wax (14°F - 21°F). Do not scrape the wax off. Leave it on to protect the base and edges.